 Save
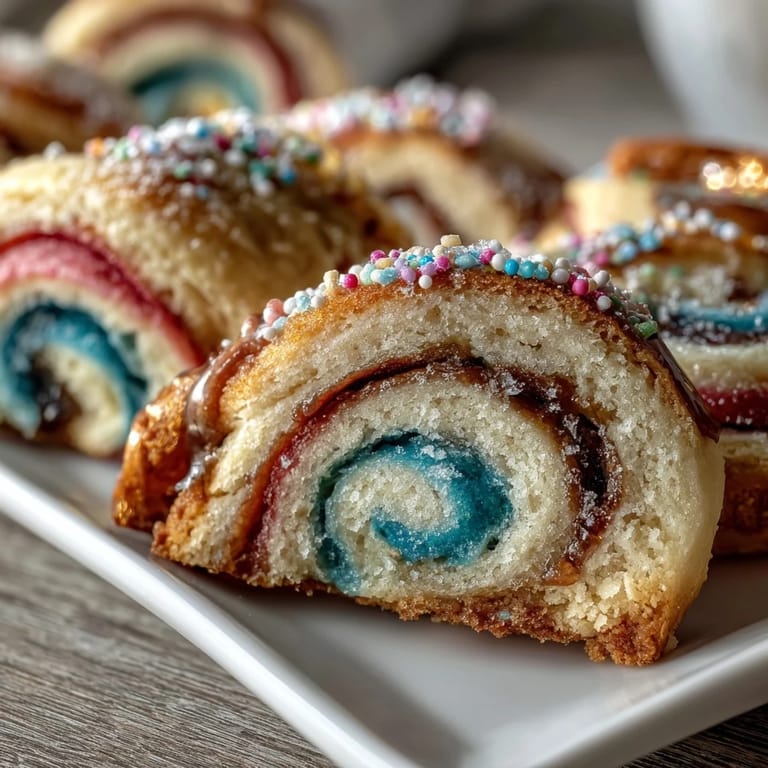
Save My niece showed me a screenshot of Cookie Run Kingdom characters mid-scroll, pointing at their swirled pastel outfits with the intensity only a seven-year-old can muster. She wanted birthday cookies that looked exactly like that—impossible colors twisted together, almost too pretty to eat. I spent an afternoon experimenting with gel food coloring and rope-twisted doughs, and somewhere between the third batch and her delighted squeal, these cookies became the star of her party.
I still picture my sister walking into the kitchen and stopping mid-conversation because the cookie log on the counter caught the afternoon light just right, all those pastels glowing. She immediately started texting photos to her book club before I'd even baked them. That's when I realized these cookies had crossed from "fun project" into "people will remember this" territory.
Ingredients
- All-purpose flour (2 1/2 cups): The foundation of a tender cookie—don't sift unless your flour is packed, and measure by spooning and leveling for accuracy.
- Butter (1 cup, room temperature): Cold butter won't cream properly, so leave it out for about an hour before starting, or cut it into cubes and let it soften faster.
- Granulated sugar (1 cup): This creams with butter to create air pockets that keep cookies soft rather than dense.
- Egg (1 large): Binds everything and adds richness—room temperature eggs mix more evenly throughout the dough.
- Vanilla and almond extracts: The almond is optional but it adds a subtle depth that people can't quite identify, which somehow makes them taste more special.
- Baking powder (1/2 tsp): A light touch of leavening gives cookies their tender crumb without making them cake-like.
- Gel food coloring: Use gel, never liquid food coloring—liquid will make your dough wet and sticky, while gel tints without changing the dough's texture.
- Pastel sprinkles (1/4 cup): These are optional but they add a playful touch that makes the whole thing feel intentionally festive.
Tired of Takeout? 🥡
Get 10 meals you can make faster than delivery arrives. Seriously.
One email. No spam. Unsubscribe anytime.
Instructions
- Combine your dry ingredients:
- Whisk flour, baking powder, and salt together in a medium bowl and set aside. This mixes everything evenly before it hits the wet ingredients, preventing lumps and pockets of flour in the final dough.
- Cream butter and sugar:
- In a large bowl, beat softened butter and sugar together for 2 to 3 minutes until it's pale, fluffy, and noticeably lighter in color. You're basically incorporating tiny air bubbles that will make your cookies tender.
- Add your wet ingredients:
- Drop in the egg, vanilla, and almond extract (if using), mixing until everything is completely combined. The dough should look smooth and slightly glossy at this point.
- Bring dry and wet together:
- Add your flour mixture to the wet ingredients, mixing just until you don't see any white streaks of flour. Stop immediately—overmixing develops gluten, which makes cookies tough instead of tender.
- Divide and color your dough:
- Split the dough into 3 or 4 equal portions depending on how many colors you want. Add a few drops of gel food coloring to each portion and knead gently with your hands until the color is evenly distributed and looks like smooth, tinted dough.
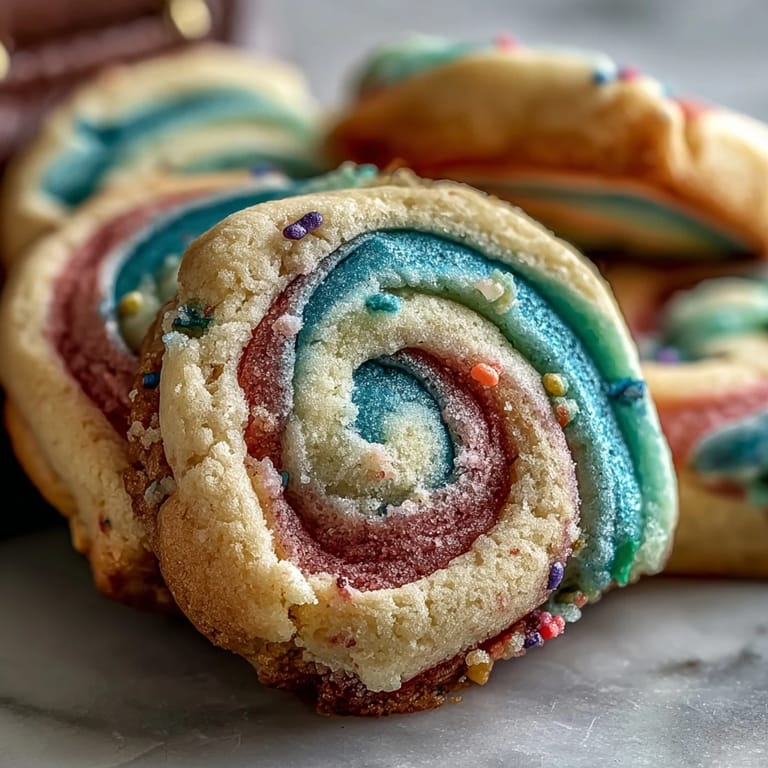
- Roll colored ropes:
- Take each colored portion and gently roll it out on a clean counter into a long rope about 12 inches. The thinner and more even you can make these, the prettier your swirls will be.
- Twist and shape:
- Take all your colored ropes and gently twist them together like you're making a braid, then roll the twisted bundle into a log. If it gets too long or unwieldy, you can slice it in half and work with two logs instead.
- Chill the dough:
- Wrap your log(s) tightly in plastic wrap and refrigerate for at least 2 hours, or even overnight. Cold dough is firm enough to slice cleanly without the colors smudging or mixing together.
- Preheat and prepare:
- Heat your oven to 350°F and line baking sheets with parchment paper. This prevents sticking and ensures even browning underneath.
- Slice and arrange:
- Using a sharp knife, slice the cold dough log into rounds about 1/4 inch thick. Place them on your baking sheets about 2 inches apart—they'll spread slightly as they bake.
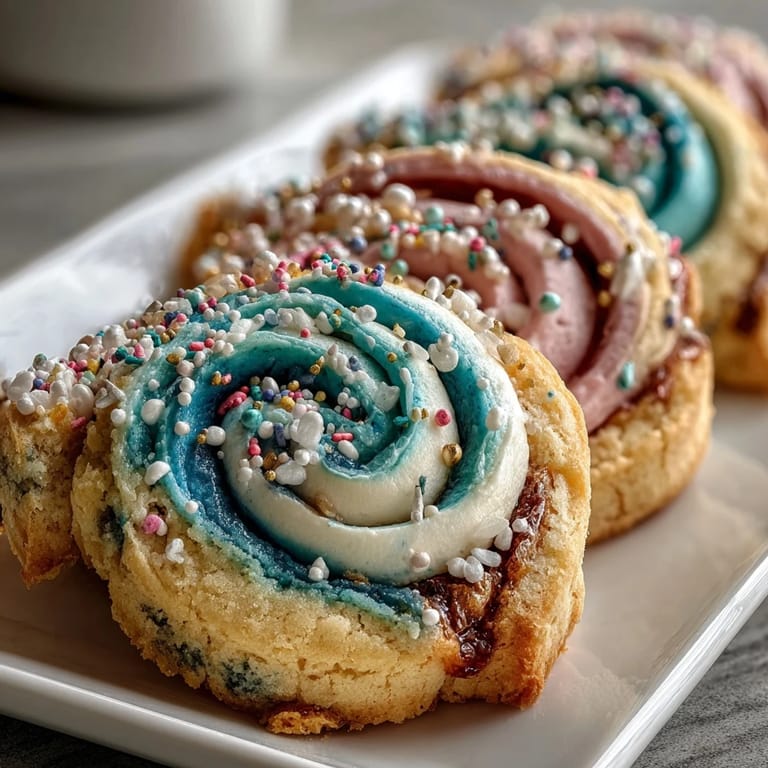
- Add sprinkles:
- If you're using pastel sprinkles, press them gently onto the top of each cookie now, before baking. They'll set into the cookie as it bakes and won't slide off.
- Bake until golden:
- Bake for 10 to 12 minutes—you're looking for just the tiniest hint of golden color at the edges while the center still looks soft. Overbaking for even two extra minutes turns them from tender to crispy, so set a timer and check early.
- Cool properly:
- Let cookies rest on the baking sheet for 5 minutes so they firm up enough to move, then transfer to a wire rack to cool completely. This prevents them from breaking apart and lets them set to the perfect texture.
 Save
Save There's something quietly magical about slicing into a cold log of twisted pastel dough and seeing the same perfect swirl appear on every single cookie. My niece helped with the slicing that first time, announcing each one like it was a tiny edible surprise, and I realized these cookies had become less about impressing people and more about sharing a moment where something homemade felt genuinely special.
Getting the Colors Just Right
The difference between pastel and neon is usually just the amount of gel coloring you use. Start with a tiny dab—seriously, the size of a pea—then knead and check the color. You can always add more, but you can't take it out. I learned this the hard way when my first batch looked more like Easter eggs than the soft, dreamy pastels I was going for. Now I keep my colors subtle, letting the buttery cookie shine through without the food coloring taste trying to take over.
Storage and Make-Ahead Tips
These cookies actually improve slightly after a day or two as the flavors settle and the texture becomes even more tender. Store them in an airtight container at room temperature for up to 5 days, or freeze the baked cookies for up to 2 months. You can also prepare the dough log, wrap it well, and freeze it for up to a month—just slice and bake straight from frozen, adding maybe 1 to 2 minutes to the baking time.
Flavor Variations to Explore
Once you master the basic swirl, these cookies become a canvas for experimentation. The base recipe is buttery and neutral enough to handle additions without losing its charm. Some of my favorite tweaks include adding lemon or orange zest for brightness, a pinch of cardamom for warmth, or even a tiny splash of peppermint extract for a festive twist.
- Lemon zest (about 1 tablespoon) brightens the whole cookie and pairs beautifully with pastel yellows and pinks.
- Brown butter adds a nutty depth that makes these feel more sophisticated and grown-up than the basic version.
- A touch of sea salt sprinkled on top before baking creates an unexpected sweet-salty moment that people absolutely love.
 Save
Save These cookies are the kind you make when you want to feel like you've created something bigger than breakfast. Serve them to people you love, and watch their faces light up the same way my niece's did.
Recipe Questions & Answers
- → How do I achieve the pastel swirl effect?
Divide the dough into portions, tint each with gel food coloring, then twist and roll the pieces together before chilling and slicing.
- → Why is chilling the dough important?
Chilling firms the dough, which helps maintain cookie shape, prevents spreading, and enhances texture when baked.
- → Can I substitute almond extract?
Yes, almond extract is optional; you can omit it or replace with additional vanilla for a different flavor profile.
- → What is the best way to store these cookies?
Store in an airtight container at room temperature for up to 5 days, or freeze for up to 2 months to preserve freshness.
- → How to prevent colors from bleeding?
Use gel food coloring for vibrant hues without adding extra liquid, and avoid overmixing the colored dough portions.
- → Can I add citrus zest for extra flavor?
Yes, adding lemon or orange zest to the dough adds a bright, fresh note that complements the buttery sweetness.